As you all hopefully know by now, Mother's day is this Sunday. In honor of special occasions that require cards, I present you with a fun tutorial to dress up a drab blank note card.
I pride myself on being fairly good about sending out cards for holidays and birthdays. Frustratingly, every once in a while life comes at me a little too fast, throws me a few curve balls, and then bam, I realize I'm out of time. That was my situation this week. When I don't send a card on-time it drives me crazy. Wednesday was my deadline for mailing my Mother's day cards.
So, now it's Thursday. The last possible day I can mail the cards and have them arrive on time. The beginning of my week came and went with a flurry of unexpected activity, none of which involved me buying, writing and mailing those oh so important Mothers Day cards. These amazing women in my life deserve a card that arrives on time, am I right?
I had to find a solution quickly, and I had to do it before Josh left for work this morning (he needed a card too). That meant that I had to use the resources available in my apartment. Nothing else. Desperate times call for desperate measures... let me tell you.
Here was my creative solution that allowed me to make a nice card and add a personal touch, all while getting the cards into that shiny blue mail box at the end of the street by 5pm:
Cost: Zero dollars!
Supply List:
Blank Note Card
Microsoft Word
A printer with regular printer paper
A glue stick or double sided tape
Construction Instructions:
Since my card was a right-to-left opening card (as opposed to opening from the bottom up) I used the column function on Microsoft Word to create a two column page. Using only the second column, I wrote 'Happy Mother's Day' and added a special note as if it were an actual greeting card. I centered the words in the column, adjusted the font, font sizes, font colors, etc. and then I pressed print!

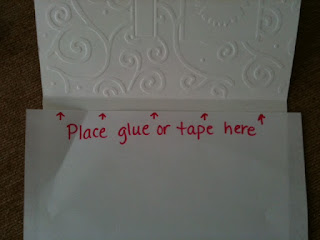
The next step is to line up the words so that they appear where they would normally be, centered on the right hand side of the card. Trim all the excess paper away using the card as your measurement guide. When everything is lined up correctly (or as you like it), make the fold in your paper.

Attach your paper to the inside crease of the card using a glue stick or double sided tape (I don't recommend the wet type of glue because it will cause your paper to crinkle.)
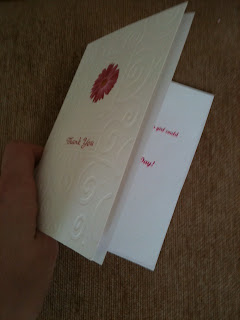
Voilà! You now have a thoughtful and lovely card that will be be appreciated by the receiver. Only draw back? No Justin Bieber or Star Wars sound chip in this card. What do I look like... Hallmark?
I pride myself on being fairly good about sending out cards for holidays and birthdays. Frustratingly, every once in a while life comes at me a little too fast, throws me a few curve balls, and then bam, I realize I'm out of time. That was my situation this week. When I don't send a card on-time it drives me crazy. Wednesday was my deadline for mailing my Mother's day cards.
So, now it's Thursday. The last possible day I can mail the cards and have them arrive on time. The beginning of my week came and went with a flurry of unexpected activity, none of which involved me buying, writing and mailing those oh so important Mothers Day cards. These amazing women in my life deserve a card that arrives on time, am I right?
I had to find a solution quickly, and I had to do it before Josh left for work this morning (he needed a card too). That meant that I had to use the resources available in my apartment. Nothing else. Desperate times call for desperate measures... let me tell you.
Here was my creative solution that allowed me to make a nice card and add a personal touch, all while getting the cards into that shiny blue mail box at the end of the street by 5pm:
Cost: Zero dollars!
Supply List:
Blank Note Card
Microsoft Word
A printer with regular printer paper
A glue stick or double sided tape
Construction Instructions:
Since my card was a right-to-left opening card (as opposed to opening from the bottom up) I used the column function on Microsoft Word to create a two column page. Using only the second column, I wrote 'Happy Mother's Day' and added a special note as if it were an actual greeting card. I centered the words in the column, adjusted the font, font sizes, font colors, etc. and then I pressed print!


Attach your paper to the inside crease of the card using a glue stick or double sided tape (I don't recommend the wet type of glue because it will cause your paper to crinkle.)

Voilà! You now have a thoughtful and lovely card that will be be appreciated by the receiver. Only draw back? No Justin Bieber or Star Wars sound chip in this card. What do I look like... Hallmark?

No comments:
Post a Comment