Monday, December 31, 2012

Inspiration Wednesday!


Hurray for Inspiration! Hurray for Wednesday! Hurray for Inspiration Wednesday!

       I am now blogging here with my fiancĂ©! Come and check us out!

This week I am inspired by Melanie, over at youaremyfave.com She always has uplifting posts, and makes you giggle, basically her blog is an Internet bear hug. I highly recommend checking her site out!

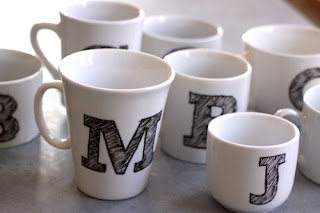
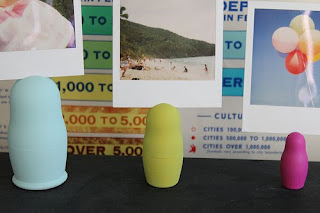
photo and directions found here
Adorable right?


Well here's what this post inspired me to make!

Before we get started you will need: two colors, your choice of acrylic cheapy cheap craft paint( I use white for a base and then a bright color), patron corks (if you don't happen to work in a bar and there for aren't privilaged with an unending supply of patron corks on a moments whim, ask your local bartender to save them for you, they usually dont mind!) wire, I used 20 gauge jewelry making wire (its easy to bend but still holds its shape) a paint brush that can paint smaller details, and thats it!


for those of you who don't know, this is a Patron cork. Hence why it Patron:)


Paint your patron cork with white acrylic paint. (wait till it drys before trying to move it, or you will have to retouch it like I did *opps* in the next picture, to make the drying process a heck of alot faster use a hair dryer!)

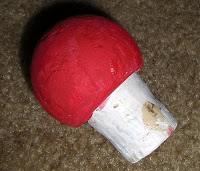
Then paint the top round part of the cork using your bright color acrylic paint, again take a hair dryer to make the paint dry faster!


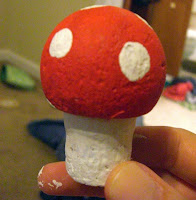
After its dry, I used the white paint to add spots, but you can always use any other color to make this toad stool pop!


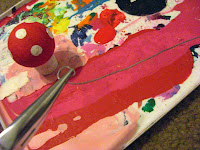
Then using needle nose plyers cut about a three to five inch piece of wire and twist the top part of the wire in a small circle.


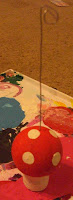
Push the wire bottom into the toad stool and place your favorite picture of your furry creature, love muffin or Paul Walker (wait is that just me?) in the circle at the top!


Whats inspiring you this week?

Monday, May 23, 2011

Healthy Weekend Treats

Dark chocolate covered anything will quickly catch my attention.  Last week I stumbled upon this delectable recipe for Chocolate covered Kiwi popsicles.  I immediately planned to make them, and since my mom was in NYC visiting, we decided to spend our Sunday making these yummy treats to snack on.  We added our own flair to the recipe and even brought in some natural whole almonds for an extra yummy treat.  So here they are for your enjoyment: Dark Chocolate Covered Kiwi Popsicles and Dark Chocolate and Toffee covered almonds!


Dark Chocolate Covered Kiwi Popsicles

What I used:
Kiwis
Ghirardelli 60% Cacao Bittersweet Chocolate Baking Chips
Canola oil (you can use coconut oil if you want to add an extra flavor kick)
Popsicle sticks
Parchment paper
A double boiler (or in my case, a pot with a small pan resting securely on top)

Peel and cut kiwis in to 1" thick rounds and shove them onto the popsicle sticks.  I set them on the parchment paper on top of a baking sheet.  Once they are all ready to go, pop those babies in the freezer until they are frozen.

Next, grab your chocolate chips and oil, and melt them together using the double-broiler (water in the bottom, chips on the top).  Once  it's all melted, transfer into a glass bowl and let it cool for few minutes.  Grab those frozen kiwis out of the freezer and start dipping.  Replace them back onto the parchment paper or let the chocolate dry and eat it right there!  I covered the kiwis and put them back into the freezer for another five minutes or so.  I love my chocolate crunchy!


Dark Chocolate and Toffee Covered Almonds

What I used:
Natural Whole Almonds
The same chocolate/oil as before
Hershey's Heath Toffee bits

Grab those almonds and start dipping them in the remainder of your chocolate sauce.  Next, sprinkle toffee bits on top of the almonds.  Once you are content with the amount of delicious almonds, pop them in the freezer for about five to ten minutes.  Take out and enjoy!!


Sneak Peek


Hope your weekend was filled with sleeping in, breakfast in bed, dancing like a fool and visit with friends! Mine was full of a "good life"on replay, bittersweet goodbye parties, blueberry beer, text message dates with the out of town boyfriend. It was def a good good life:)


Heres a sneak peek at whats inspiring me this week:


and please forgive me but i dont know where this image is from it got lost in blogger world so if this is your image please let me know so i can credit it to you!


make today beautiful!

Wednesday, May 18, 2011

Inspiration Wednesday!

Hurray for Inspiration! Hurray for Wednesday! Hurray for Inspiration Wednesday!


It's Tuesday night, well technically Wednesday morning and I am sipping a glass of wine and multi tasking watching an old episode of CSI:Miami. Love.

Another thing I love is Makingitlovely,. This week I am inspired by Nicole, blogger behind Makingitlovely. Nicole works on restoring an older house with her husband and has some awesomely creative ideas on how to do it yourself! Not only is she bettering her home, she is bettering herself. Before she turned 30 she made a list of thirty things she wanted to do before her birthday. You can find that list right here

Indulge me while I list my twenty nine things to do before I am 29:)


1. blog more frequently about crafts. relationships life

2.out of credit card debt for real.

3.run. a half marathon.

4.sketch alot.

5.sew 100 sharks.

6.make a difference. loan to kiva

7.wake up! save sleeping in for the weekends.

8. write letters

9.make three new quality friends.

10.find a home church and get involved

11.get student teaching stuff in order for spring

12.cook more. eat out less.

13.take a multi vitamin

14. sew three items following a pattern

15. visit my brother

16. passport renewed.

17. visit the dentist

18. buy a new couch

19. pray for Eric and I

20. get a facial

21. illustrate a childrens book

22. finishthe jellyfish painting

23. detail the car

24. call grandma and gram more

26. read jane austins complete works

27. organize my photos

28. wear at least 1 cute outfit per week.

29. make this

whats inspiring you this week?

Wednesday, May 11, 2011

Rockstar Chalkboards!


Everyone likes a good two for one deal, right?  Well, in today's post you get just that; I have a fun photo frame chalkboard tutorial that includes an exciting chalkboard paint tutorial.  I cannot express how excited I am to share this tutorial with you all!

My cost: less than $10

Supply List:
Acrylic or latex craft paint
Gloss paint (to add shine to the frame)
White, dry, non-sanded Grout
Picture frame (your choice of size) 
Sand paper
Paint sponges or brushes
Washable/recyclable mixing bowls
Chalk

My supplies - minus the sandpaper


Step 1 - Prepping and painting the frame:  Select your colors.  When making your color choices, remember that the darker ones tend to work better as the chalkboard.  Remove the glass, matting, etc from the frame. Rough up the surface of the frame with sandpaper; this is not required, but it does makes painting easier.  Paint your frame the color of your choosing.  I put three coats on each, but do what looks best to you. If your paint isn't already glossy, add a coating of gloss paint.  Let the frame dry completely.

Ready for a coating of gloss
Step 2 - Mixing your chalkboard paint:  When making my chalkboard paint, I made small batches at a time to conserve the paint I had.  Use your best judgement when deciding how much to make.  Also, there are many recipes for chalkboard paint on the internet; some vary slightly, others veer off completely.  I chose to experiment with the mixing process on my own, to find the right ratio of paint to grout.

The ratio I used was approximately 4:1, four parts paint to one part dry grout.  In measurement terms, I used about a teaspoon of dry grout and four teaspoons of paint the first time and it turned out nicely.  Play with the mixture on your own, and go for a 'brownie batter' consistency.  Get rid of as many lumps in the mixture as possible (some are ok).

Step 3 - Prepping and painting your chalkboard:  Lay your piece of glass down on a flat surface and sand one side until it is evenly and thoroughly scratched up.  Shoot for the 'more scratched up than my old pair of glasses' look.  Next, put that chalkboard paint to use and slather it all over the newly scratched up glass.  You will need multiple coats to create an even coating, so let this coat dry for a bit.  Keep applying coats of chalkboard paint until you are happy with the overall appearance.

Step 4 - Letting it all dry:  I cannot stress how important it is to let everything dry overnight.  Give it at least 8-12 hours, in a safe place where it won't be touched, bumped or messed with.

...Ok, ok... so if you are really eager to use your chalkboard, I've heard that using a blow-dryer to speed up the drying process works well.  I haven't tried it, so I can't attest to the effectiveness, but I'm pretty sure it works.

Step 5 - Priming and reassembling your chalkboard:  Take a piece of chalk, lay it on it's side and then rub it all over your nice, clean new chalkboard.  Get it nice and chalky and then erase it with a dry eraser or paper towel.  Reassemble the picture frame; I kept the extra cardboard and replaced it behind the glass for added support.  Project complete!  Now you can write on your fantastic new chalkboard all you want.


Thursday, May 5, 2011

Personalize a Blank Note Card

As you all hopefully know by now, Mother's day is this Sunday. In honor of special occasions that require cards, I present you with a fun tutorial to dress up a drab blank note card.

I pride myself on being fairly good about sending out cards for holidays and birthdays. Frustratingly, every once in a while life comes at me a little too fast, throws me a few curve balls, and then bam, I realize I'm out of time.  That was my situation this week.  When I don't send a card on-time it drives me crazy.  Wednesday was my deadline for mailing my Mother's day cards.

So, now it's Thursday.  The last possible day I can mail the cards and have them arrive on time.  The beginning of my week came and went with a flurry of unexpected activity, none of which involved me buying, writing and mailing those oh so important Mothers Day cards.  These amazing women in my life deserve a card that arrives on time, am I right?

I had to find a solution quickly, and I had to do it before Josh left for work this morning (he needed a card too).  That meant that I had to use the resources available in my apartment. Nothing else.  Desperate times call for desperate measures... let me tell you.

Here was my creative solution that allowed me to make a nice card and add a personal touch, all while getting the cards into that shiny blue mail box at the end of the street by 5pm:

Cost: Zero dollars!

Supply List:
Blank Note Card
Microsoft Word
A printer with regular printer paper
A glue stick or double sided tape

Construction Instructions:  
 Since my card was a right-to-left opening card (as opposed to opening from the bottom up) I used the column function on Microsoft Word to create a two column page.  Using only the second column, I wrote 'Happy Mother's Day' and added a special note as if it were an actual greeting card.  I centered the words in the column, adjusted the font, font sizes, font colors, etc. and then I pressed print!


The next step is to line up the words so that they appear where they would normally be, centered on the right hand side of the card.  Trim all the excess paper away using the card as your measurement guide.  When everything is lined up correctly (or as you like it), make the fold in your paper.


Attach your paper to the inside crease of the card using a glue stick or double sided tape (I don't recommend the wet type of glue because it will cause your paper to crinkle.)


VoilĂ !  You now have a thoughtful and lovely card that will be be appreciated by the receiver.  Only draw back? No Justin Bieber or Star Wars sound chip in this card.  What do I look like... Hallmark? 

Wednesday, May 4, 2011

Inspiration Wednesday!


Hurray for Inspiration, Hurray for Wednesday, Hurray for Inspiration Wednesday!


My beautiful new sister!

This Week I was inspired by a post from DesignMom back in November. Her daughter made these adorable monogrammed mugs for Christmas for all their family member (how fantastic is that, a diy Christmas, awesome!)


image and directions found here

I just knew I had to make my very own!
My brother was getting married so I thought since his bride loves everything handmade and her shower theme was Monogram, that this would be the perfect occasion to showcase my easy peasy diy mugs! I took a little license while making my own. First I went to the dollartree, and found two white mugs, DesignMom went to the thrift store but you could also even use old mugs that you already own.

Then I went to AC Moore and bought the porcelaine pen in black, it was about four dollars but if you go online and get an ACMoore coupon you can save up to half. I did buy the transfer paper that DesignMom suggest but I found that hand drawing it while looking up a font that I liked was much easier (or you could even use a stencil) and used pencil before I decided on a final product. After I was happy with the results I used the porcelaine pen and then baked the mugs as stated on pen directions.


The result was so awesome! They were a hit at the shower! Instead of doing just a regular monogram I did special "Mr. and Mrs." Mugs so they will never be confused about whose coffee is whose, because you know, you don't want to get cooties!

My only complaint about the porcelaine pens is that they don't last long, so I would suggest maybe getting two or a variety of colors! Total cost for each mug is a little over 2 dollars when factoring in the porcelaine pen!

Whats inspiring you this week?

Tuesday, April 26, 2011

Turn his drab old shirt into a cute tunic!


What can you do with that old button-down shirt he doesn't wear anymore?  Make a cute tunic or dress!

This was my first attempt at upcycling a men's shirt, and it came out so much cuter than I had hoped!  The hanger does not do it justice, I really must post another pic.

Tutorial to come soon!


Monday, April 25, 2011

Past Projects

I made this pillow in summer 2009. I love the ruffles! This was a quick and easy pillow to make.

Past Projects

These pillows were a project I completed in 2009. When I say completed what I really mean is that these pillows are done, but their twins are laying around sad and unfinished. I really must get on that!

Personalize your fridge magnets!


This project was very easy and enjoyable to do!  It is a great way to add your own flair and personal style to any magnetic surface in your home or workplace.

Time: 10 minutes

Cost: $13

Supply List:
 Staples Magnet Sheets
A printer
Scissors
Photos or images

I have only used one sheet of this wonderful magnetic paper.  I am giddy with excitement, thinking about all the possible uses for these customizable magnets!  Next, I will be printing out some of my favorite family photos for my fridge.

Pajama Pant Challenge: Item #3


I used the fabric and elastic from my pajama pant to make this simple and quick headband.  The bow was recycled too! (In a former life, that gray ribbon was the handle on an Ann Taylor Loft shopping bag.)

Friday, April 22, 2011

Challenge accepted!

One pant leg down, one to go. So far I've completed two useful items: a yoga mat bag and a cute cover for my day planner.


For the yoga bag, I used the drawstring from the pants as the strap.  The hem at the bottom of the pant leg was just too cute, so I used it as the drawstring enclosure.

On my book/planner cover, I added a simple embellishment using cute polka dot ribbon. 

Now time for more brainstorming... What else do I want to make?

Challenge:

Create as many cute and crafty things as possible out of one pair of pajama pants.

Thursday, April 21, 2011

Easter Egg Springtime String Lights

Last week, Spring seemed to finally arrive.  The weather had been toying with our emotions for well over a month, but Spring finally made its grand entrance and showed Winter who's boss!  Yeah! Go Spring!

The trees bloomed over night and the birds just won't stop chirping (not that I'm trying to stop them).

With my excitement about the appearance of spring combined with the absolutely beautiful weather we have been enjoying, I decided to make a simple Easter themed craft.   This one is cheap and easy!  It took me about 15-20 minutes to construct these super cute Easter egg string lights.

Cost: $2

Supply List:
A string (or strings) of small white holiday lights
Plastic Easter Eggs (I found the bright colored ones look best)
Drill and 1/4" drill bit
Safety goggles/glasses/sunglasses... protect those eyes!
Clear tape
Scissors
Electricity
Your Hands

Construction Instructions:

1. Open your eggs and place them flat ends down.  Carefully and slowly, hold the egg firmly to steady and drill a hole into the top end of each Easter egg. 
2. Once all of the holes are in place, use your scissors to cut a line from the middle (flat end) up to the hole.  Cut carefully, quick snips end up chipping/cracking the eggs.
3. Insert the egg onto a light through the new opening we just created.
4. Realign the top of the egg where we made the cut, and place a piece of tape on the cut on the inside of the egg.  This will hold the top together again so that the egg is able to pop closed like normal.
5. Continue process until each light is covered with an egg.
6. Plug in to your electrical outlet and enjoy!