Last week, Spring seemed to finally arrive. The weather had been toying with our emotions for well over a month, but Spring finally made its grand entrance and showed Winter who's boss! Yeah! Go Spring!
The trees bloomed over night and the birds just won't stop chirping (not that I'm trying to stop them).
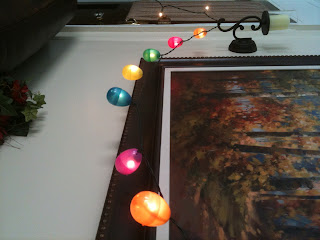
With my excitement about the appearance of spring combined with the absolutely beautiful weather we have been enjoying, I decided to make a simple Easter themed craft. This one is cheap and easy! It took me about 15-20 minutes to construct these super cute Easter egg string lights.
 Cost: $2
Supply List:
A string (or strings) of small white holiday lights
Plastic Easter Eggs (I found the bright colored ones look best)
Drill and 1/4" drill bit
Safety goggles/glasses/sunglasses... protect those eyes!
Clear tape
Scissors
Electricity
Your Hands
Construction Instructions:
1. Open your eggs and place them flat ends down. Carefully and slowly, hold the egg firmly to steady and drill a hole into the top end of each Easter egg.
2. Once all of the holes are in place, use your scissors to cut a line from the middle (flat end) up to the hole. Cut carefully, quick snips end up chipping/cracking the eggs.
3. Insert the egg onto a light through the new opening we just created.
4. Realign the top of the egg where we made the cut, and place a piece of tape on the cut on the inside of the egg. This will hold the top together again so that the egg is able to pop closed like normal.
5. Continue process until each light is covered with an egg.
6. Plug in to your electrical outlet and enjoy!
The trees bloomed over night and the birds just won't stop chirping (not that I'm trying to stop them).
With my excitement about the appearance of spring combined with the absolutely beautiful weather we have been enjoying, I decided to make a simple Easter themed craft. This one is cheap and easy! It took me about 15-20 minutes to construct these super cute Easter egg string lights.

Supply List:
A string (or strings) of small white holiday lights
Plastic Easter Eggs (I found the bright colored ones look best)
Drill and 1/4" drill bit
Safety goggles/glasses/sunglasses... protect those eyes!
Clear tape
Scissors
Electricity
Your Hands
Construction Instructions:
1. Open your eggs and place them flat ends down. Carefully and slowly, hold the egg firmly to steady and drill a hole into the top end of each Easter egg.
2. Once all of the holes are in place, use your scissors to cut a line from the middle (flat end) up to the hole. Cut carefully, quick snips end up chipping/cracking the eggs.
3. Insert the egg onto a light through the new opening we just created.
4. Realign the top of the egg where we made the cut, and place a piece of tape on the cut on the inside of the egg. This will hold the top together again so that the egg is able to pop closed like normal.
5. Continue process until each light is covered with an egg.
6. Plug in to your electrical outlet and enjoy!
No comments:
Post a Comment